Follow Me On Social Media!
Old Fashioned Chocolate Pie: Irresistibly Creamy Delight!
Introduction to Old Fashioned Chocolate Pie
Nothing quite matches the comfort of a slice of old fashioned chocolate pie. As I write this, I can almost picture my grandmother in her cozy kitchen, the sweet aroma of melting chocolate wafting through the air. It’s a dessert that transcends generations, connecting us to simpler times spent in warm kitchens, laughter shared over dessert, and, perhaps, a little bit of mischief as we sneak a spoonful of the luscious filling.
The old fashioned chocolate pie is more than just a dessert; it’s an experience that encapsulates nostalgia. The rich, velvety chocolate filling set in a buttery crust evokes memories of birthdays celebrated and family gatherings cherished. It’s the kind of pie that has graced many holiday tables, where every forkful brings back cherished moments, from children’s faces lighting up after the first bite to grown-ups reminiscing about their own childhoods.
What makes this pie truly special is its simplicity. With a few quality ingredients, you can create a dessert that feels like a warm hug—comforting and satisfying. Imagine the rich chocolate flavor mingling with just the right amount of sweetness, all encased in a perfectly baked crust. Each bite is a reminder that sometimes, the best things in life are the simplest. Plus, it’s an excellent way to show off your baking skills at your next gathering, impressing friends and family alike.
And let’s not forget about the versatility of the old fashioned chocolate pie. Whether enjoyed on a special occasion or whipped up as an at-home treat for a cozy night in, its charm is universal. It invites you to gather around the table, share stories, and create new memories, much like those we hold dear.
So, ready to dive into this delectable journey? Let’s get started and bring the warmth of an old fashioned chocolate pie into your kitchen!

Key Ingredients for Old Fashioned Chocolate Pie
Homemade Pie Crust
A flaky, buttery base is essential for a perfect old fashioned chocolate pie. While a store-bought crust adds convenience, making your own enhances the flavor and texture. The joy of rolling out dough and the wonderful aroma that fills your kitchen is unbeatable!
Semi-Sweet Chocolate Chips
These are vital for achieving a rich, chocolatey filling. The sweet, decadent flavor of semi-sweet chocolate chips strikes the ideal balance, making every bite of your pie a delightful experience.
Whole Milk
Whole milk is critical for providing that creamy texture we all crave in an old fashioned chocolate pie. Opting for low-fat milk won’t give you the same indulgence. Trust me—if you’re going to treat yourself, go full cream!
Granulated Sugar
While sweetness is essential, it’s all about balance. Granulated sugar enhances the chocolate flavor without overpowering it, allowing the rich notes to shine through.
Cornstarch
This ingredient acts as a thickener, giving us that pudding-like filling that’s the hallmark of a perfect chocolate pie. A pudding-style texture creates a satisfying bite that melts in your mouth.
Why You’ll Love This Old Fashioned Chocolate Pie
A decadent dessert that’s easy to make
When you take that first forkful of old fashioned chocolate pie, you may find yourself transported back to grandma’s kitchen, overwhelmed by nostalgia. This dessert combines simplicity with indulgence, making it a dream to prepare. The ingredients are straightforward: rich cocoa powder, creamy milk, and a handful of pantry staples meld together to create a filling that’s both velvety and satisfying. Unlike many complicated desserts, this pie doesn’t demand hours of your time—whip it up in under an hour and let it chill while you contemplate your next Netflix binge.
The perfect blend of nostalgia and modern flavors
There’s something uniquely comforting about a classic old fashioned chocolate pie. It evokes childhood memories of family gatherings and late-night cravings. Yet, it doesn’t shy away from modern flavors. The deep, intense chocolate contrasted with a buttery crust provides a delightful experience for both the traditionalist and the adventurous eater. Sprinkle some sea salt on top or pair it with a scoop of vanilla ice cream to elevate your dessert into a culinary masterpiece. Whether it’s a weeknight treat or a centerpiece for your next gathering, this pie will make your taste buds sing and your heart skip a beat.

Tips for Making the Best Old Fashioned Chocolate Pie
Blind baking the crust for perfect texture
To create a beautifully flaky and crisp crust for your old fashioned chocolate pie, blind baking is essential. This process involves pre-baking the crust before adding the filling, which prevents it from becoming soggy. To achieve the best results, line your pie crust with parchment paper and fill it with pie weights or dried beans. Bake it in a preheated oven until it’s lightly golden, making sure to remove the weights halfway through to ensure even cooking. This technique not only enhances texture but also provides a sturdy base that complements the rich chocolate filling perfectly.
Cooling periods that enhance flavor and texture
Don’t skip the cooling phases when preparing your old fashioned chocolate pie. Allowing your pie to cool gradually after baking helps the filling set correctly and can intensify the flavors. After you’ve added the filling, let the pie sit at room temperature for about 30 minutes. Then, refrigerate it for at least a couple of hours before serving. This resting period creates a luscious texture and allows the various components to meld together, culminating in a delightful slice that will impress everyone at the table. Remember, patience pays off when it comes to great desserts!
Time Breakdown for Old Fashioned Chocolate Pie
Creating a decadent old fashioned chocolate pie is a delightful adventure, and understanding the time commitments can help make your baking experience even more enjoyable.
Preparation time: 60 minutes
The first step in your journey involves gathering your ingredients and preparing the filling. Expect to invest about an hour in this part of the process, as you blend your chocolate, eggs, and other components into a luscious filling.
Chilling time: 6 hours (or overnight)
Once your pie is assembled, it’s crucial to chill it before serving. This waiting period allows the flavors to meld beautifully and the filling to set perfectly. Plan for at least six hours here—overnight is even better if you can wait!
Total time: 7 hours
Overall, you’re looking at a total commitment of about seven hours from start to finish. But don’t worry—the waiting only builds the anticipation for that first, heavenly slice of old fashioned chocolate pie!

Nutritional Information for Old Fashioned Chocolate Pie
Creating an indulgent old fashioned chocolate pie is not only about the rich taste but also knowing what’s in every heavenly bite. Understanding the nutritional information helps you enjoy this treat while being mindful of your health.
Calories: A rich delight that can be portion-controlled
An entire slice of old fashioned chocolate pie is a delightfully rich source of calories, typically around 350-400 calories per serving. This means that savoring a modest slice allows you to enjoy its decadence while managing your overall caloric intake. Remember, it’s all about balance!
Sugar: Balancing sweetness for a satisfying treat
Each slice of this pie contains about 25 grams of sugar. While it satisfies the sweet tooth, consideration for moderation can help you enjoy its flavors without overindulging. Pairing this pie with fresh fruit can also help balance the sweetness.
Protein: Benefits from egg yolks and milk
The egg yolks and milk in the old fashioned chocolate pie contribute about 5-6 grams of protein per slice. This protein adds a bit of nutritional value to your dessert, making it not just a sweet treat but also a source of nourishment. Enjoy the pie knowing each bite provides a small protein boost too!
FAQs about Old Fashioned Chocolate Pie
If you’re navigating the delightful world of old fashioned chocolate pie, you might have a few questions swirling around in your mind. This scrumptious dessert has a way of bringing comfort and nostalgia to any gathering, but here are some common queries that can enhance your baking experience.
What can I substitute for cornstarch?
Cornstarch acts as a thickening agent in this recipe, ensuring that your filling is velvety and holds together beautifully. If you’re out of cornstarch or looking for alternatives, here are a couple of options:
- Arrowroot Powder: This is an excellent replacement that will give your pie a similar consistency. Use the same amount as cornstarch.
- All-Purpose Flour: If you have flour on hand, it’s a viable option, but you’ll need to use about twice as much to achieve the same thickening effect.
How do I store leftover pie?
After indulging in your old fashioned chocolate pie, you might be wondering how to preserve its deliciousness. To keep it fresh:
- Store leftover pie in the refrigerator, covered, for up to three days.
- If you anticipate more than a couple of days of leftovers, you can freeze slices wrapped in plastic wrap and then foil to protect against freezer burn. Just remember to let it thaw in the fridge before enjoying it again.
Can I make this pie in advance?
Absolutely! One of the great aspects of old fashioned chocolate pie is its ability to be made ahead of time. You can prepare and bake the pie 1-2 days in advance. Just ensure you let it cool completely before refrigerating. When it’s time to serve, allow the pie to sit at room temperature for about 10-15 minutes for the best texture. Enjoy the smiles that this delightful pie brings!
Conclusion on Old Fashioned Chocolate Pie
There’s something truly special about an old fashioned chocolate pie. It brings back memories of family gatherings and cozy evenings, serving as a delicious reminder of how home cooking can warm the heart. This dessert is not just a treat; it’s a slice of nostalgia that can be shared with friends and loved ones.
Making your own old fashioned chocolate pie allows you to enjoy rich flavors and a creamy texture that store-bought versions simply can’t match. Whether for a special occasion or just as a treat for yourself, this pie is a must-try that rounds off any meal perfectly. Grab a fork, dig in, and savor each blissful bite!
Print
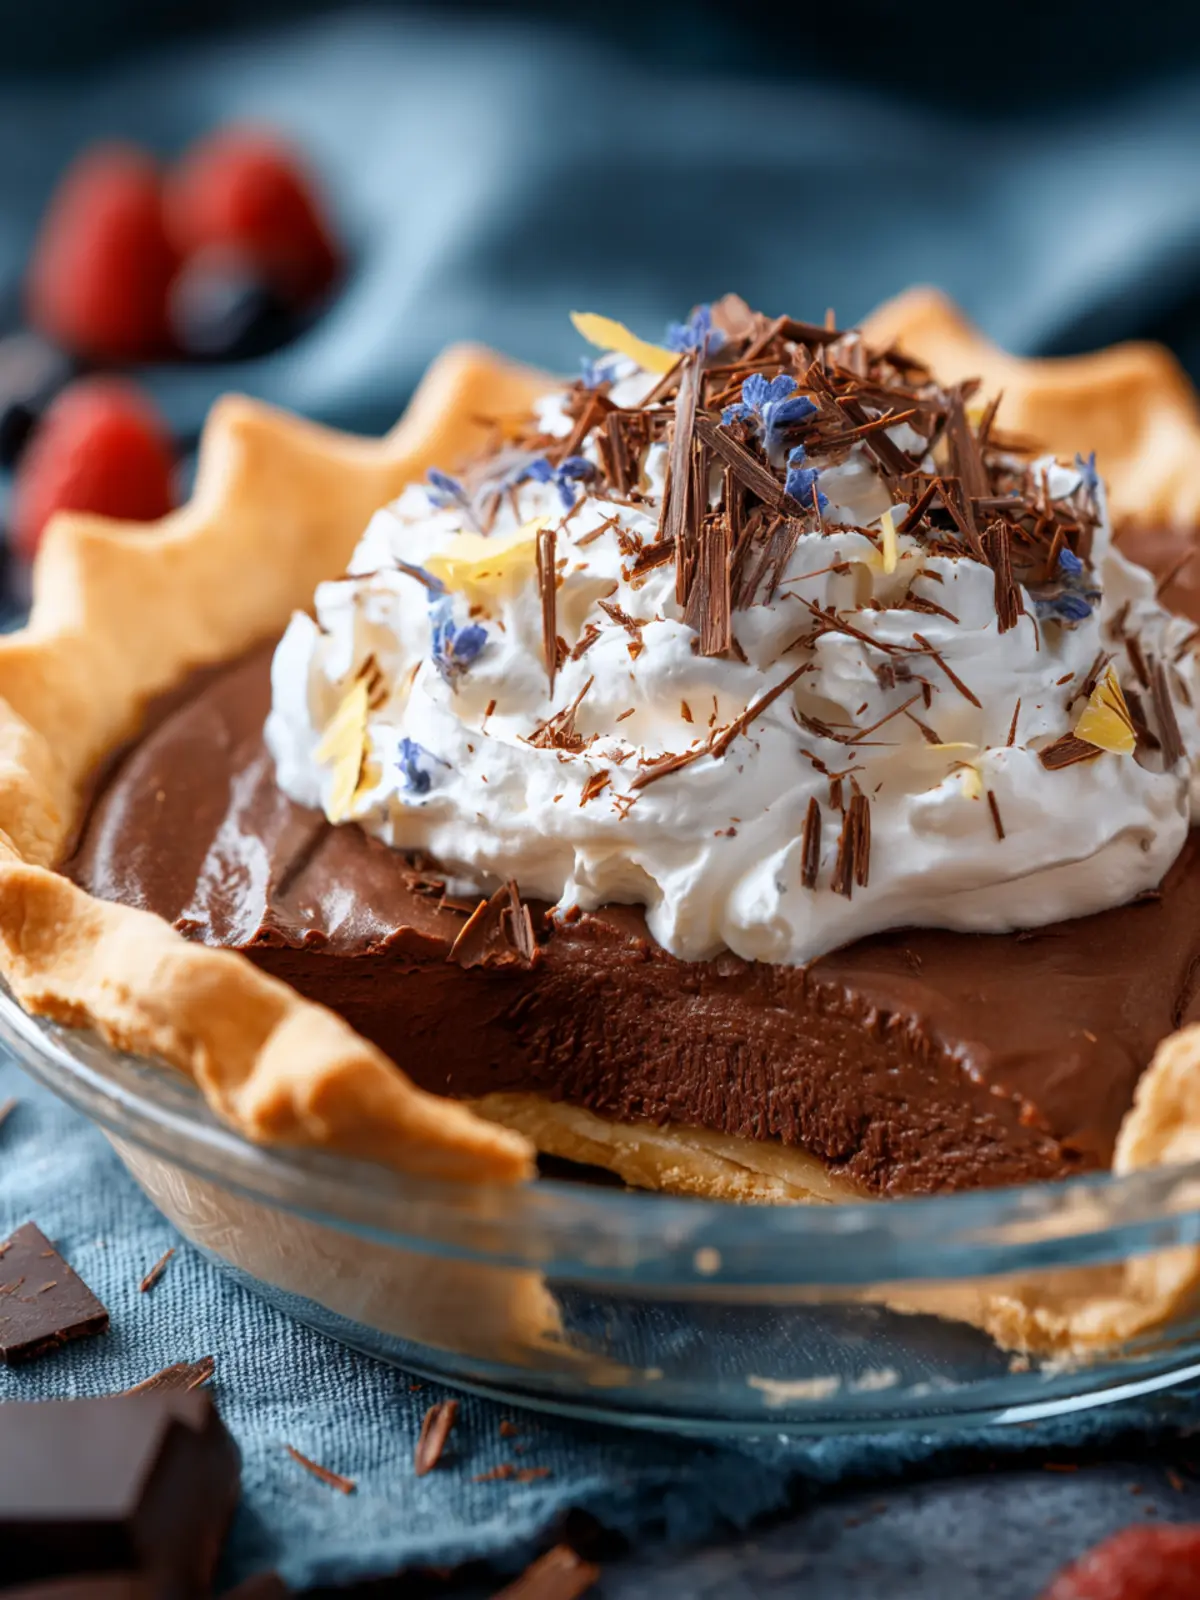
Chocolate Cream Pie
- Total Time: 6 hours 5 minutes
- Yield: 8 servings 1x
- Diet: Vegetarian
Description
A delicious chocolate cream pie made with homemade or store-bought pie crust topped with whipped cream.
Ingredients
Scale
- 1 homemade or store-bought pie crust
- ⅔ cup (133g) granulated sugar
- ⅓ cup (37g) cornstarch
- ½ tsp salt
- 4 egg yolks
- 3 cups (710ml) whole milk
- 1 ¾ cups (298g) semi-sweet chocolate chips
- 2 Tbsp (29g) unsalted butter
- 2 tsp vanilla extract
- Whipped Cream for topping
Instructions
- Follow our Homemade Pie Crust instructions to make a homemade crust. Once the crust is assembled and fluted in the pie pan, place it in the refrigerator to chill for 30 minutes.
- Preheat the oven to 400ºF. Rearrange the baking racks so you can put the pie on the bottom rack.
- Use a fork to dock the bottom of the pie crust.
- Line the crust with a large piece of parchment paper. Then use a few layers of aluminum foil to create a bowl shape that fits within the pie pan. Fill the foil with dried beans, rice or granulated sugar. This is to help weigh down the pie crust, preventing bubbles or shrinking.
- Place the pie crust on the bottom rack and bake for 20 minutes. After 20 minutes, remove the pie crust from the oven and carefully remove the dried beans, rice or granulated sugar along with the foil and parchment paper. Return to the oven and bake for 5-20 minutes longer or until the crust is golden.
- Allow the crust to cool completely before adding the filling.
- In a medium pot, stir together the granulated sugar, cornstarch and salt. Set aside.
- In a separate bowl, whisk together the egg yolks and whole milk. Gradually whisk the milk mixture into the dry ingredients in the pot.
- Set the heat to medium, and whisk the mixture frequently, until the mixture just begins to boil, about 6-7 minutes. The mixture will foam. Remove the pot from the heat. The mixture should have thickened into a pudding-like consistency.
- Whisk in the chocolate chips, butter and vanilla extract. Use a spatula to scrape the bottom and sides of the pot, fully incorporating everything. Allow the mixture to cool for 10 minutes.
- Pour the pie filling into a blind baked pie crust. Allow it to cool on the counter for 30 minutes. Cover the top of the pie filling with plastic wrap to prevent the pudding from developing a skin.
- Refrigerate the pie overnight, or at least 6 hours. Before serving, top with whipped cream and chocolate shavings.
Notes
- This pie can be made with either a homemade or store-bought pie crust, but blind baking is recommended.
- Chilling the pie before serving improves the texture of the filling.
- Prep Time: 20 minutes
- Cook Time: 45 minutes
- Category: Dessert
- Method: Baking
- Cuisine: American
Nutrition
- Serving Size: 1 slice
- Calories: 300
- Sugar: 18g
- Sodium: 150mg
- Fat: 15g
- Saturated Fat: 8g
- Unsaturated Fat: 6g
- Trans Fat: 0g
- Carbohydrates: 35g
- Fiber: 1g
- Protein: 4g
- Cholesterol: 120mg